foreach( $_POST as $varname => $value ){
if( substr( $varname , 0, 3 ) == 'txt' ){
for( $i = 0 ; $i < count( $carts ); $i++ ){
$item = $carts[$i];
if( $item->id == substr( $varname , 3 ) ){
$item->quantity = $value;
$carts[$i] = $item;
}
}
}
}
27 tháng 12 2006
13 tháng 12 2006
PHP - Insert to array
$arr = array();
array_push( $arr,"1" );
array_push( $arr,"2" );
array_push( $arr,"3" );
array_push( $arr,"4" );
print_r( $arr );
echo "
" . $arr[2];
array_push( $arr,"1" );
array_push( $arr,"2" );
array_push( $arr,"3" );
array_push( $arr,"4" );
print_r( $arr );
echo "
" . $arr[2];
04 tháng 12 2006
02 tháng 12 2006
29 tháng 11 2006
PHP - Remove , merge Item Array
 your solution is array_merge(), which will reindex a numeric array.

So if you have

$array[0] = "something";
$array[1] = "something else";
$array[2] = "yet another";

unset($array[1]);
$array = array_merge($array);

the result is

$array[0] = "something";
$array[1] = "yet another";
PHP - Deep Copy
 An improvement to the array_deep_copy function I posted ages ago which takes a 'snapshot' of an array, making copies of all actual values referenced... Now it is possible to prevent it traversing the tree forever when an array references itself. You can set the default $maxdepth to anything you like, you should never call this function with the $depth specified!
/* Make a complete deep copy of an array replacing
references with deep copies until a certain depth is reached
($maxdepth) whereupon references are copied as-is...  */
function array_deep_copy (&$array, &$copy, $maxdepth=50, $depth=0) {
    if($depth > $maxdepth) { $copy = $array; return; }
    if(!is_array($copy)) $copy = array();
    foreach($array as $k => &$v) {
        if(is_array($v)) {        array_deep_copy($v,$copy[$k],$maxdepth,++$depth);
        } else {
            $copy[$k] = $v;
        }
    }
}

# call it like this:

array_deep_copy($array_to_be_copied,$deep_copy_of_array,$maxdepth);
?>
Hope someone finds it useful!
28 tháng 11 2006
Date Format 02
SimpleDateFormat sDateFormat;
sDateFormat = new SimpleDateFormat( "dd-MM-yyyy");
return sDateFormat.format( now);
sDateFormat = new SimpleDateFormat( "dd-MM-yyyy");
return sDateFormat.format( now);
Date Format 01
import java.text.DateFormat;
import java.util.Date;

public class DateFormatExample1 {

   public static void main(String[] args) {
       // Make a new Date object. It will be initialized to the current time.
       Date now = new Date();

       // See what toString() returns
       System.out.println(" 1. " + now.toString());

       // Next, try the default DateFormat
       System.out.println(" 2. " + DateFormat.getInstance().format(now));

       // And the default time and date-time DateFormats
       System.out.println(" 3. " + DateFormat.getTimeInstance().format(now));
       System.out.println(" 4. " +
           DateFormat.getDateTimeInstance().format(now));

       // Next, try the short, medium and long variants of the
       // default time format
       System.out.println(" 5. " +
           DateFormat.getTimeInstance(DateFormat.SHORT).format(now));
       System.out.println(" 6. " +
           DateFormat.getTimeInstance(DateFormat.MEDIUM).format(now));
       System.out.println(" 7. " +
           DateFormat.getTimeInstance(DateFormat.LONG).format(now));

       // For the default date-time format, the length of both the
       // date and time elements can be specified. Here are some examples:
       System.out.println(" 8. " + DateFormat.getDateTimeInstance(
           DateFormat.SHORT, DateFormat.SHORT).format(now));
       System.out.println(" 9. " + DateFormat.getDateTimeInstance(
           DateFormat.MEDIUM, DateFormat.SHORT).format(now));
       System.out.println("10. " + DateFormat.getDateTimeInstance(
           DateFormat.LONG, DateFormat.LONG).format(now));
   }
}
27 tháng 11 2006
Web Page Layout 04
Designing Personal Web Page Layout
Then do on the contrary. Create first the orange circle and inside of it - one small white circle.
Take a brush then of small size and with the color 7f7f7f and make two points, like in the picture.

Take the instrument
 and build a line between them, like in the picture.
Use another instrument now
 and draw a white, discontinuing stripe, like in the picture.
Take another instrument
 now and the white color and picture the same thing from below:
Take the instrument
with white color and represent the same form the picture below:
And several more, like it is demonstrated:

The last stage includes adding the text, applying the necessary type, size and color.

Web Page Layout 03
Designing Personal Web Page Layout
Write the text now, applying the appropriate type. Place it, like it is done in the picture.
Use the instrument
 then and make a figure of white color (holding Shift button, make several intersecting circles of different sizes, several times to get the same sum from the picture).
Copy the figure’s layer and make everything to look like in the picture.

Write the text now, applying the appropriate type and place it the same way from the picture below:

Write more, applying the necessary type and place it like it is done in the picture also.

Take the next instrument
and make a figure of arrange color (holding the Shift button, draw several intersecting circles of different sizes, several times, to get the same sum form the picture. Use Blending Options on the layer, Stroke – the color must be white and 3 pcx).
Further take a photo with your picture, but you should choose the one that is possible to put in the orange figure’s limits. Place the photo’s layer on the orange figure. Press Alt button, click between the layers of the figure and the photo and we’ll get the same thing form the picture below:

Take the instrument
and represent a white circle, like it is done below:
Its inside must be colored in f2a90f and its size must be the same form the picture:

Web Page Layout 02
Designing Personal Web Page Layout
Take the instrument and make a small circle of white color and place it the same way it is done in the picture.

Write the text now, applying the parameters below:

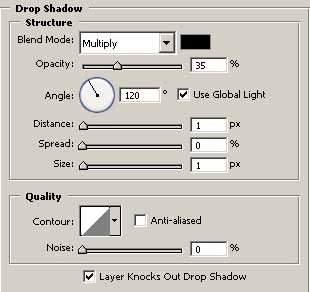
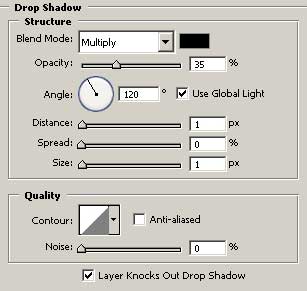
Blending Options-Drop Shadow
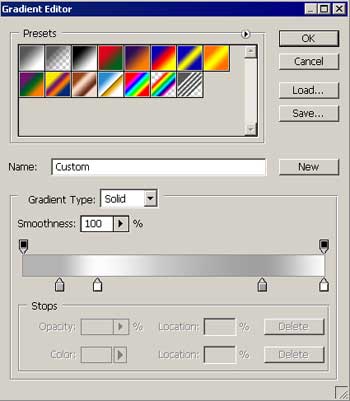
Blending Options-Gradient Overlay
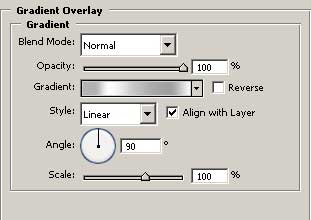
Gradient’s parameters
Take the instrumentto draw a figure of white color (holding on the Shift button, create intersecting themselves circles of different sizes, several times and you must get the same thing from the next picture).

Copy the layer with the collected figure, looking like a button and place it the same way from the picture. Insert the changes (place the second half-circle inside, exactly like in the picture).

Create on more button the same way we’ve created the button next to Personal Page words.

And one more.

Take a brush of small size and represent a pointer of white color (the corner is possible to create holding the Shift button, or point it, draw aside the brush on the necessary distance and holding Shift button click on the left mouse’s button on the place that is reserved for the line’s end).

and make a small circle of white color and place it the same way it is done in the picture.Write the text now, applying the parameters below:
Blending Options-Drop Shadow
Blending Options-Gradient Overlay
Gradient’s parameters
Take the instrument
to draw a figure of white color (holding on the Shift button, create intersecting themselves circles of different sizes, several times and you must get the same thing from the next picture).Copy the layer with the collected figure, looking like a button and place it the same way from the picture. Insert the changes (place the second half-circle inside, exactly like in the picture).
Create on more button the same way we’ve created the button next to Personal Page words.
And one more.
Take a brush of small size and represent a pointer of white color (the corner is possible to create holding the Shift button, or point it, draw aside the brush on the necessary distance and holding Shift button click on the left mouse’s button on the place that is reserved for the line’s end).
Web Page Layout 01
Designing Personal Web Page Layout
Create a new file having 766x606 px and 72 dpi. Color the layer in black, with the instrument  . Now use the instrument
  to draw a grey short stripe. Set the adjustments in Blending Options, like it is demonstrated in the picture.


Copy the stripe then and turn it horizontally, using Free Transform option.

Copy the lower stripe’s layer and place it the way it is done in the picture. Set out Opacity of 15%.

Use the brush after that and make a circle with the color 707070. Erase a part of it to be exactly like in the picture.

Use the instrument again to represent a black figure , which bounds may be seen in the picture. Click on Blending Options, Stroke on the layer and choose the white color and 2 pcx.

Use the same instrument and draw a white figure. Place it the way it is in the picture.

Copy the layer with the recently created figure. Turn it around using Free Transform and keeping pressed the Shift button, make it smaller, exactly like in the picture.

Use the instrument to make a figure of white color. Use Free Transform to turn it on 45 degrees, like in the picture.

. Now use the instrument to draw a grey short stripe. Set the adjustments in Blending Options, like it is demonstrated in the picture.Copy the stripe then and turn it horizontally, using Free Transform option.
Copy the lower stripe’s layer and place it the way it is done in the picture. Set out Opacity of 15%.
Use the brush after that and make a circle with the color 707070. Erase a part of it to be exactly like in the picture.
Use the instrument
again to represent a black figure , which bounds may be seen in the picture. Click on Blending Options, Stroke on the layer and choose the white color and 2 pcx.Use the same instrument
and draw a white figure. Place it the way it is in the picture.Copy the layer with the recently created figure. Turn it around using Free Transform and keeping pressed the Shift button, make it smaller, exactly like in the picture.
Use the instrument
to make a figure of white color. Use Free Transform to turn it on 45 degrees, like in the picture.
Đăng ký:
Bài đăng (Atom)